How to Make a Photo
200 x 200 Pixels on
Your iPhone
Resize photos to exactly 200×200 pixels on iPhone with Shortcuts, Photos, or free web apps. Ideal for avatars & thumbnails, try ProBatchResizer for batches!
Table of Contents
Ever needed a quick square thumbnail for a social media profile or an app upload? Resizing a photo to exactly 200 by 200 pixels on your iPhone doesn’t require fancy software—just a few taps in built-in tools or free apps. I’ll walk you through the simplest ways, whether you’re cropping and scaling a single shot or handling multiples. This works on iOS 19 and later, based on the latest updates.
Why Resize Images to 200×200 on iPhone?
A 200×200 pixel image is compact, perfect for avatars, icons, or low-res web elements where file size matters. It keeps things sharp without eating up storage or bandwidth. If your original photo is larger—say, from an iPhone 16 Pro’s camera—you’ll likely need to crop to a square aspect ratio first, then scale down the resolution to hit those exact dimensions. Skipping this can distort the image or leave it oversized.
Method 1: Using the Built-in Shortcuts App
The Shortcuts app comes pre-installed on your iPhone and lets you resize images to precise pixel sizes without downloading extras. It’s great for automation too.
First, open the Shortcuts app and tap the plus icon to create a new shortcut. Search for “Select Photos” and add it as the first action—this pulls in your image from the Photos library.
Next, add the “Resize Image” action. Set the width to 200 pixels; it’ll auto-adjust height if the aspect isn’t square, but for 200×200, you’ll want to crop beforehand. To do that, insert a “Crop Image” action before resizing, choosing “Square” from the presets.
Finally, add “Save Image” to store the result back in Photos. Run the shortcut, pick your photo, and you’re done. For step-by-step visuals, check Apple’s support page on Shortcuts
Method 2: Cropping and Resizing in the Photos App
If you just need a quick crop to square (which often gets you close to 200×200 after export), stick with the native Photos app. It’s not pixel-perfect for resizing, but combined with export tricks, it works for basic needs.
Open Photos, select your image, and tap Edit. Hit the crop icon at the bottom—it looks like a square with arrows. Choose “Square” from the aspect ratio options, then pinch to zoom and drag to frame your subject. Tap Done to save.
To reduce the actual pixel count, share the cropped photo via email or Messages and select a smaller size option during export. This compresses it down, often landing near 200×200. For more control, pair this with a third-party tool.

Method 3: Third-Party Apps for Precise Control
For exact 200×200 resizing without hassle, grab a free app like Photoroom, Image Size or Photoshop Express from the App Store. These handle pixel dimensions directly.
In Photoroom, open the app, go to AI Tools > Resize, upload your photo from your camera roll, then choose Custom Dimensions to enter 200 for both width and height (it auto extends or fits the canvas smartly with AI). Tap Done to export, super fast for clean results, especially if you need backgrounds handled too.
In Image Size, import your photo, enter 200 for both width and height, and toggle “Lock Aspect Ratio” off if needed (though it’ll stretch if not square). Hit the resize button, then export as JPEG or PNG. It’s quick and preserves quality better than basic crops.
Photoshop Express offers similar tools with added filters—open your pic, go to Crop & Rotate, select Custom, and input 200×200. Save and share. Both apps are rated highly for iOS image editing.
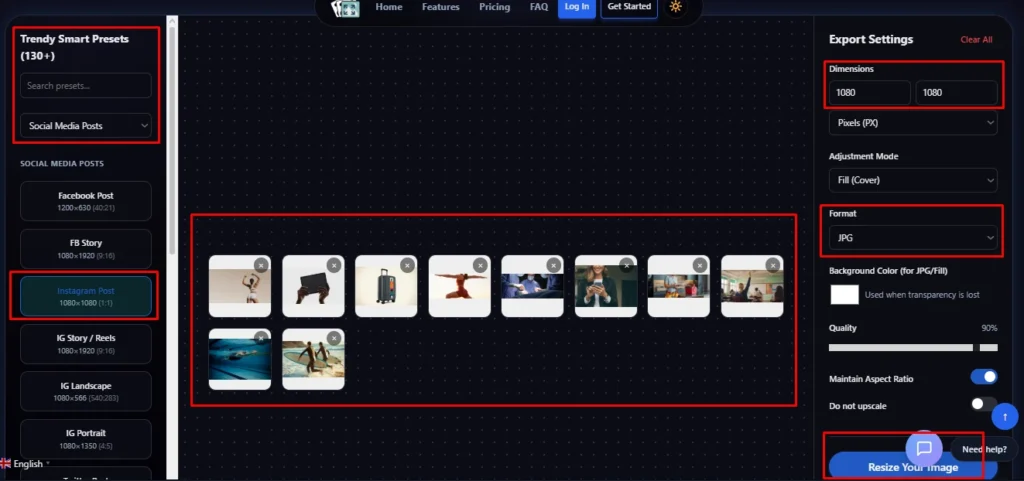
No app needed on iPhone? Open Safari and use an online tool like ProBatchResizer. Upload or drag photos from your camera roll, set 200×200 (or any size), batch process instantly in-browser. Fast, private, zero downloads—ideal for quick thumbnails!
Handling Multiple Photos: Batch Resizing Tips
Dealing with a bunch of images? The Shortcuts app can loop through selections, but for heavy lifting across devices, online tools shine. If you’re resizing batches for a project, learn how to batch resize images efficiently—it’s a game-changer for workflows.
Frequently Asked Questions
No, the native Photos app is great for cropping to square but lacks precise pixel control. Use the Shortcuts app for exact 200x200 results, or download a free app like Image Size. For faster result use online web app ProBatchResizer one-tap resizing.
Open the photo in Photos, tap Edit > crop icon, choose Square aspect ratio, adjust the frame, then tap Done. This creates a perfect 1:1 base to avoid distortion during precise resizing.
Image Size is top-rated—simple, free (with ads), and lets you enter exact 200 width/height pixels. Photoshop Express is a solid alternative if you want extra filters and edits.
Yes, downscaling from high-res shots (like 48MP) loses some detail, but it stays crisp for avatars/thumbnails if you crop first and avoid heavy compression. Always keep the original saved.
Shortcuts can loop small batches. For bigger sets or easier cross-device use, try an online batch tool like ProBatchResizer.com—upload from your iPhone, set custom 200x200, and process instantly in Safari. Fast, private, no app needed.
Final Tips for iPhone
Image Resizing
Always back up originals before editing, as resizing can reduce quality if overdone. Check the final file in Settings > Photos to confirm dimensions.
For related tasks like compressing iPhone photos or adjusting resolution on iPad, the same methods apply. If you’re stuck on an older iOS version, update for better tools or use online tool like ProBatchResizer.
This approach keeps your photo editing simple and mobile-friendly.
Related Articles
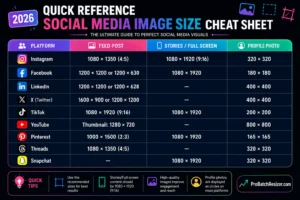
Social Media Image Sizes 2026: Only Cheat Sheet You Need
Social Media Image Sizes 2026: The Only Cheat Sheet You Need In 2026, most platforms favour 1080px wide images and vertical 9:16 or 4:5 formats.
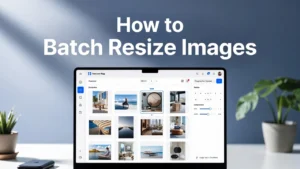
How to Batch Resize Images on Mac (Free & Easy)
How to Batch Resize Images on Mac (Free & Easy) Discover how to batch resize images on mac with this online web tool without losing